
The Making of VAM Varieties
Sources
Search
Contact
Home


The VAMs
What Is A VAM?
Interest & Rarity
Hubs to Dies
New VAM Variety
Obverse Dies
Reverse Dies
Clashing
What Constitutes a VAM
In the section on hubs and dies we gave a high level explanation of how Morgan Dollars were produced. This discussion takes that to a more detailed level.
To understand VAMs at their highest and basic levels you need to understand the process used to create the coins. In particular you need to understand the coin creation process and the opportunities for errors to be introduced into the ultimate struck coin.
When Morgan Dollars were created a hub and die procedure was used to create both master dies and working dies. This is a process where images are transferred from positive to negative impressions on steel cylinders. In 1881 this required a lot of manual work, and the opportunity to introduce errors was high. It was only the skill of the engravers that made this process manageable.
Other than VAM 1, all other VAMs are coins that exist in a state that is "other than intended" by the Mint, or particularly the engraver. When you understand all the steps involved in the making of the final working dies there is a much better understanding of the process and how VAMs are introduced.
Who Does What
Congress plays a bit more of a role in the creation of a coin than we thought before we started our studying. Whether good or bad, or right or wrong, for the Morgan Dollar here is how it happened.
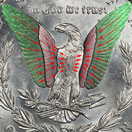
When the Bland-Allison Act was passed it contained some specifications for the dollar. In general it stated that the obverse was to have a head of liberty and the words "E PLURIBUS UNUM". On the reverse it was to have an eagle's head, the words "UNITED STATES OF AMERICA" and the words "In God we trust".
How these were to look was left up to the director of the Mint and the engraver.
Timing, Effort, and Control
As described by George Morgan in Mint correspondence, these steps took months and not days. It was all manual or required manual manipulation of early machinery to produce.
We are sure that quality control was a priority for official coinage but with this many manual steps and the number of dies needed, perfection was an illusion.
Definitions
If you are going to converse intelligently with other VAM collectors then there is a language that is unique to the hobby that you need to understand. Here are some important terms.
Hub - A steel cylinder inscribed with the positive image of the coin.
Die - A steel cylinder struck with the negative image of the coin.
Master Hub - The hub on which the first image of the coin is made in the size to be struck. This cylinder is too valuable to use in actual production and is used sparingly to make master dies. This is a positive image.
Master Die - A master die is created using a master hub. Usually there would be a limited number of master dies. The master dies are used to make working hubs. This is a negative image.
Working Hub - These hubs are made from master dies and are more prolific. They are used to make the final working dies. This is a positive image.
Working Die - This is the final steel cylinder used in the coin making process. Usually the dies would last for 100,000 to 150,000 coins, but some mints stretched their usage beyond those figures. This is a negative image.
Device - The primary image on either the obverse or reverse of the coin. This is the image transferred to the master hub from the engraver's design. For Morgan Dollars this is only Liberty's Head on the obverse, and only the eagle on the reverse.
Motto - On the obverse it is the words "E PLURIBUS UNUM" and on the reverse it is the words "In God we trust".
Legend - On the obverse it is the word :LIBERTY" on the headband. On the reverse it is the words "UNITED STATES OF AMERICA".
Reduction Machine - A device used to reduce the engraver's working model to the size of the finished coin. For Morgan dollars this was the British made Hill Reduction Machine.
Basin - The polishing of a surface to remove imperfections.
Annealing - Softening a metal by heating it.
Tempering - Hardening a metal by heating, striking, or a combination of processes.
Sources and Issues
It helps to have some common background for discussion and this took a little work for us to dig out as we explored VAMing. The absolute best book on this process that we have found is the Mallis and Van Allen book The Comprehensive Encyclopedia, Morgan and Peace Dollars. But even as good as this book is you will need to do additional reading to help cement it in your mind.
What made the process difficult for us was that individuals involved in collecting VAMs know intuitively from years of work what all the components of VAMs and the underlying processes were. But for a novice trying to decipher all of it is difficult.
Hopefully this discussion will help if you are just getting started. You will find the process somewhat foreign because we live in a time when the technology is so different from the processes of 150 years ago that understanding is just plain difficult.
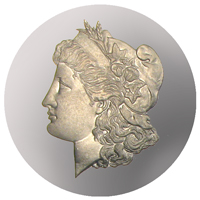
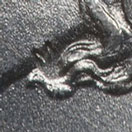
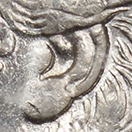
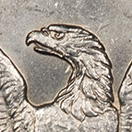
Artist's rendition of what the master hubs for the Morgan Dollar might have looked like with only the devices engraved.

Making Morgan Dollars and Resulting VAMs
Stage
Activity
VAM Issues
Pattern Creation
The approved design would be created on a round wax or clay surface scaled up to be a size that is workable to the engraver. Usually this was about five times the size of the actual coin.
At this stage there really are few if any issues. Once approved, it is the deviation from this "standard" that becomes an issue.
Plaster Casting 1
Once approved, the engraver's work was transferred to a plaster cast of the original, This would have been a negative of the original used to create a positive image for transferring to the master hub.
The engraver had to touch up the casting to correct any problems with the casting.
Plaster Casting 2
The first plaster casting had to be reestablished as a positive image again, so a casting of the first negative casting was made.
The engraver had to touch up the casting to correct any problems with the casting.
Hardening and Producing a Galvano Surface
To make the casting tough enough to be used in the reduction machine, the plaster casting had to be coated with metal. This was done by coating the plaster with bees wax, then powdered copper, and then electroplating it into a metal surface. This produced a copper shell that was then strengthened by filling the shell with lead.
The engraver had to touch up the galvano plate to correct any problems with the electroplating.
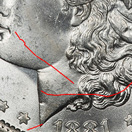
The galvano plate was then used in a Hill reduction machine to transfer the image from the plate to a hub. The reduction machine used a rotating method of "reading" the galvano, so the resulting hub was left with narrow concentric circles of lines that had to be removed by the engraver to restore the reduced image to the desired image detail. A master hub had to be annealed to make it workable, and then tempered at the end of the process to make it tough enough for transferring its image to a master die. For our 1881-O obverse, only Hub III2 has been identified as the master hub. For the reverse of the 1881-O only Hub 3c has been identified as the master hub. These hubs had specific features that are uniquely associated with them which you can read about here.
The operator also had to use his experience and knowledge to make the transfer. The engraver had to touch up the master hub to remove the reduction lines and to sharpen any features left dull by the operator.
Image Transfer to Master Die
The master hub and master dies were difficult to make, so working hubs had to be created from the master die. Master dies had to first be annealed, and then tempered so that their negative image could be transferred to a working hub. It was intended that the master die be a point of control whereby all working hubs would be struck from a single master die.
The engraver had to touch up the master die to resharpen any features left dull by the image transfer. The transfer was done through as many as three strikes by the hub. The strikes could temper the die, so subsequent annealing could be necessary. Annealing and tempering the master die had to be done with great care so as to avoid distorting the image.
Lettering the Master Die
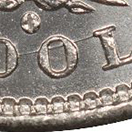
Features like adding the legend, motto, date, and stars were done manually and were not part of the original image created for hubs. Presumably these features would not have transferred well using the pantograph, or the die would last longer when created this way.
To help with alignment of the lettering, stars, and date reference circles were faintly drawn on the die using an instrument like a protractor. These were then polished from the die when it was basined.
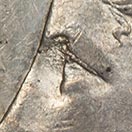
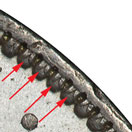
All of these were added by hand stamping them into the die. Since most took more than one blow, the opportunity to create multiple or defective features was highly likely. It is here that near and far dates, doubled stars,
For dates there was the possibility of using a working die from one year into the next. This could create over-dates when not done perfectly.
Image Transfer to Working Hub
Integrity of the working hub was essential for making consistent dies and ultimately coins. We know that there were multiple differences in the hubs because of the ultimate transfer of those to the working dies.
The working hub was used repeatedly to make working dies, often as many as 250 dies. Assuming that quality control was perfect, the working hub would have the same image as the original master hub.
The transfer was done through as many as three strikes by the master die. The strikes could temper the hub, so subsequent annealing could be necessary for a complete image transfer. The working hubs had to be examined for imperfections, which were then removed through polishing or other methods.
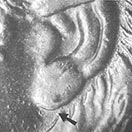
It is at this stage that a primary feature of the obverse device was introduced. On the obverse the word LIBERTY was added to Liberty's crown by manually punching in the word. This obviously opens the door to variations in that feature.
Image Transfer to Working Die
This is the production of the final die to be used in striking coins. Once created it had to then be carefully tempered or hardened for use. Once hardened the die could be used for up to 200,000 coins.
Working dies have the greatest effect on the number and variety of VAMs. While it is the hubs and dies that produce the groupings of VAMs, it is the addition of the final features that created the varieties we recognize.
For a coin to be a VAM the features recognized must be transferred from the final working die to the planchet. This eliminates from the discussion errors in the actual striking process or environmental problems.
From Mint reports we know that there were a total of 119 working dies produced for use in New Orleans in 1881.
Often dies developed defects as use increased, and when these could be corrected they were re-polished to remove things like clashed impressions and wear.
For mint marks there was another variable where they could be added at the branch mint, or reused at a different mint. Most often the feature was not properly centered or struck tilted right or left.
Making Pattern Coins
Before the final die is approved for striking coins, a limited number of test or "pattern" coins were struck. These were returned to the engraver and Mint managers for final approval.
Changes could be made to the original pattern or hub and the process done all over again to get to the final working dies.
Basining the Die
The final working dies were basined or polished to prepare them for use. It was the polishing of the field and not the devices that actually took place. You have to imaging polishing the flat part of the die, and that the recesses created for the raised areas could not be polished.
Basining was used to produce early proof coins at the main mint, but also used to prepare other dies. Coins struck early in the die use produced what we call "Deep Mirror Proof Like" coins.
As the die received further use coins were created as "Proof Like" coins, and then the normal mint state coins.
Basining is one source of variation in coin quality. The process of final preparation for use was left up to the branch mint. The skill and quality control was often uneven, so DMPL and PL coins from different mints take on a quality that is individual to that mint. But the differences can go further in that not all dies in all years were prepared by the same person. So even within a mint there will be quality differences.
Production
Once all these steps were completed the dies were ready to be used to produce coins. They were aligned in the press, a planchet inserted between the dies, and then struck three times to fully transfer the die image to the planchet.
Since dies define VAMs, then production should have little if anything to do with the definition. One exception is clashed dies where no planchet was inserted and the two dies were allowed to strike each other. This effectively altered the dies, and coins struck with these altered dies are given recognition when the clashing was significant enough to produce the transfer of lettering from one die to the other.
Getting Started
Collecting The 1881-O
The 1881-O VAMs